Wednesday, March 25, 2009

Part 2 -- Staging Your Home and A Little Tour


Staging your home for sale is basically "setting the stage" for potential buyers.
Your goal is to sell your house by positively influencing a buyer's emotions!

You can do this by stimulating the 5 senses through furniture placement and flow, proper scale and balance, color, encouraging a sense of spaciousness, letting light in, and encouraging emotion.
Starting at the curb, take an objective look at your house. Imagine never having seen your house before. Are there any improvements that you could make to make your house seem like the warmest, most cheerful, most welcoming house on the block?

If you're having trouble with this, take a walk or drive around your neighborhood or town and think about what draws you to a particular house. Or think about what you want to see when you go house-hunting.

Do you want to see a nicely mowed lawn? A fresh full layer of mulch? Colors of flowers in pots or neatly planted? A beautifully painted front door? A place to sit and enjoy lemonade on the porch? The exterior lights on to welcome you and the interior lights all on inside (with the shades open) to look as bright and pretty as can be? No clutter shoved on the side of the house, and no toys strewn about the driveway?

Well, that's what potential buyers for your house are also looking for!
Create a wonderful "First Impression" that makes buyers want to come inside to see the rest of your beautiful home!! :)

Make sure your entryway is welcoming by including a vase of fresh flowers. Choose one type of bloom in a single color so that they look pretty, but aren't distracting attention from your house.

Turn on ALL of the lights inside your house when you have a showing, even when the sun is shining brightly outside. The reason for doing this is to chase away those little shadows in the house that make your rooms seem smaller. You want your house to look bright and spacious!

Check your furniture placement to see if any furniture may need to be re-arranged or moved about for better flow and to encourage a sense of space in your home. Ask a friend for help if you need a second opinion.
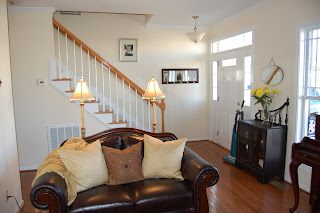
{If you look at my living room in the pic above, I have moved an accent table out of the room completely, and moved the loveseat that was on an angle to be parallel with the bookshelves. This delineates the space and makes the room seem bigger!}

Also take a look at the colors used in your house. Especially the wall colors. Are they appealing to most buyers? Or is the hot pink or periwinkle blue only favored by a few??
I'd encourage you to make your walls a warm, neutral color (which doesn't mean builder-beige), and save the more taste-specific color for accents.


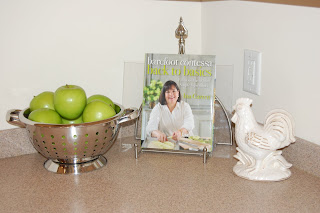
In the kitchen you will want to clear off the counters so that buyers will see all of the prep space they will have! Place the toaster in a cabinet for storage, and just pull out when you want to use it. Set a little vignette in a corner, like the one below.

Here I just used a cookbook, some faux apples in a stainless-steel colander, and a little rooster.
I already had everything, and it looks cheerful, works with the colors in my kitchen space, and encourages the emotion of cooking in the kitchen.

I'd also encourage you to: place a vase of fresh flowers on the kitchen table, clear EVERYTHING off of your refrigerator, stick dishes right into the dishwasher to keep the sink clear, and keep some "break-n-bake" cookies on hand to throw into the oven when you get a call someone wants to show the house! Just bake 3 and take them in the car with you for a snack :)! Stick the cookie sheet back in the oven or dishwasher (I use a small toaster oven size cookie pan), and the aroma of freshly baked cookies will be incredibly enticing!
If you have pets, and if possible, don't leave them in the house when it's being shown to a potential buyer. Some buyers are allergic, and some just don't like animals, plus they may think that carpet would have to then be replaced, etc. This could be a turn-off for your house. When showing your house, also take Fido's bed and doggy dishes with you. Basically erase all evidence of a pet.

Make all the beds every morning, taking extra special care with the Master Bedroom.

Make this room look luxurious and spacious.
Add a couple of pretty pillows and maybe a throw across the bottom.

You could place a tray with a bottle of wine or sparkling juice, 2 wine glasses, and a box of chocolates on the bed or dresser for added romance and luxury!!

Be sure to have your closets (throughout the house) look tidy and roomy by donating/boxing up things you don't need.

If kids' bedrooms are looking crowded because of all of their toys, box 3/4 of it up. It will be less that you have to clean on a daily basis now, and will look SO much better! The kids will also be excited to see what they have to play with at the new house! :)

The bathrooms should have all of your daily grooming gear placed neatly away.
Buyers don't want to see your toothbrushes or hairdryers.

Get a small squeegee and wipe down the bath/shower after use.

Place clean, fluffy towels on the towel bars in a coordinating color.
I suggest using your best towels for display, or if yours are getting threadbare, purchase some very inexpensive ones (like the BHG brand from WalMart I used in the pic below).
This will give a clean, spa-like feel to the bathroom!

It's said that kitchens and the Master bedroom and bathrooms are what can make or break a buyers buying decision. So focus on these areas!!


Next time, on Part 3, I'll show some more little tips and tricks for staging,
along with a few more photos of my house! :)

I hope that you're enjoying this little series!

ps....for some more great home staging advice, read the Nester's and Remodeling Guy's staging tips!

Tuesday, March 24, 2009

Going from a HOME to a HOUSE -- Part 1: Getting It Ready

Yes, you read that title correctly! Today let's talk about

Going From A HOME to a HOUSE.

This is going to be part 1 of a several part series. Then afterward, I'll share with you about Going From A HOUSE to a HOME.

It sounds like so many of you out there either currently have your house up for sale, or are thinking about it, that I thought I'd share some ideas with you on the subject of getting your house ready to sell and staging.

However, these aren't just ideas for those wanting to sell, they can be used by anyone wanting to just freshen up their current home, too! :)

Going From a HOME to a HOUSE is a very important thing to remember if you're selling. (Ignore this if you're not! :) Just think of it as bringing order to your home instead!) When you are getting your home ready to sell, you need to take a step back and look at your house objectively.

There is lots we can DO to get our house ready to sell, but did you know that it really should begin in your MIND??

We have so many lovely memories tucked into our hearts that revolve around our homes. We have family photos and personal collections and mementos throughout our house, which is part of what makes it feel like home to us. Our home is a nice place for friends and family to visit, and others may comment on our pretty decorating.

But the goal in having our house for sale is getting it SOLD!!!

You have to stop thinking of this as YOUR HOME, and start thinking of it hopefully belonging to another family soon. Take pictures around your home to remember it by, and then focus on your new goal.

A prospective buyer must be able to walk around your house, and picture themselves living there! When they start doing that, that's when houses get sold!

So, don't automatically assume that a buyer will think your collection of 50 ducks spread throughout your kitchen will be as cute as you do, or that they will "know that we still have to live here" and they'll ignore the pile of dirty laundry on the floor, or that they will want to see every photo of your sweet cutie-patooties!

You don't want buyers focusing on your STUFF, you want them focusing on the HOUSE!

*1: REMOVE CLUTTER!

Go through each room objectively. Sort items into Keep, Donate/Sell, and Trash.

Immediately get the trash and donation items out of there!! Plan your garage sale for an upcoming date, or better yet, just list larger ticket items on Craigslist and call it a day. Be sure to really think about what you want to take with you. It costs money to move your stuff, and the less stuff you have, the less it'll cost you. It's also the less stuff you'll have cluttering up the new house! :)

*2: BOXING DAY!

Remove most of your family photos (leaving a couple smaller special ones is okay). Wrap your collection of Disney items carefully for the new house. Got too much stuff jammed into your clothes closet, even after sorting for the donation pile? Box up your out of season items. Same goes for your kitchen cupboards...never use that omelet maker but once a year? Box it up.

Buyers want to see SPACE in a house!

De-personalize and clear out the "extras" so that they can picture themselves LOVING their new life in the house! :)

{Someone asked me where it was ok to keep these boxes. A corner of your basement, attic, or garage is fine, as long as your garage isn't horribly crammed full of stuff already. Ask a friend to loan you some space in their garage or storage shed if needed, too. If you have TONS of boxes, rent a storage space. The cost of that may be worth it if it helps your house sell quickly because a buyer thinks it seems so spacious and roomy!)

*3: MAKE NECESSARY REPAIRS and IMPROVEMENTS!

Now that your house is nice and clutter-free :) you can easily get to work!!

Notice I said "necessary" repairs. In these economic times, it isn't wise to spend lots of money on home improvements when selling. However, make sure to repair anything that could hinder the sale of your home (like a leaky spot in your roof).

This is also going to involve touching up paint around the house, making sure your carpets and floors look clean, giving your front door a fresh coat of glossy paint, and your landscaped beds a fresh topping of mulch.

It doesn't have to cost much, especially if you do the labor yourself for the easy stuff, but can make a HUGE impact on your house's appeal to buyers!!!

*4: GET IT SPARKLY CLEAN!

Make sure windows are sparkling, mirrors are shined, wood floors are gleaming, carpets stain-free, counters crumb free, ceiling fixtures dust free, and furniture pet-hair free.

Look over the house from ceiling to baseboards, front porch to back door, and roof to basement.

A clean house let's buyers know that you have taken excellent care of your home, and if they don't see any little problems, then they don't get worried about any big problems that might be hidden away.

I'm also going to touch on the issue of smell here. Have you ever noticed that every house has a unique "scent"? Some smell wonderful, like fresh baked cookies. Some smell like dirty dog, or mildew, or shoe. I am quite sure that none of you lovelies have a house that smells bad :), however... Get yourself a good friend to tell you if you need to freshen up the good scent factor.

Keep your pets (if you have any) bathed and groomed regularly to reduce any odors or pet hair.

And don't overdo the scented stuff either. This could backfire if a buyer is allergic to fragrances. Open your windows for fresh air if it's nice. Grind some citrus peels into the garbage disposal. Take out the trash daily. Clean often. If lighting a candle, make sure it's a "neutral scent" like a soft vanilla. If things are pretty bad in a certain area, use Febreeze spray to get rid of the odor smell. Just use a tiny squirt of a spray though, cause this stuff is powerful! It'll work, you just don't want to get knocked over by it :)!


*5: GET IT STAGED!

{Tomorrow's post!}


You've got your list for getting your house ready now!

Do it in order, take lots of deep breaths, and know that you are making a BIG difference!

Whether it results in your house getting SOLD, or in feeling a sense of order and peace for spring cleaning your current home, I hope that you can smile with each accomplishment!

Believe me, if I can do it (and I just did!) then you can too!!! :)

Come back and visit me again tomorrow, Y'all!


Monday, March 23, 2009

Mini Dining Room Makeover

Here's another project that I've been wanting to show you!
Remember when my dining room looked like this in the fall??


Well, in preparation for putting our house on the market, we did a simple mini-makeover a' la Designed To Sell!
First things first, since our home has a very open floor plan with mainly the same color used throughout, we decided to "upgrade" the formal dining room and give it some deliniation and extra zing with a new paint color!
We used SWLatte, and do we ever love it a "latte"! :)
I'd definitely use this paint color again!!
It blends well with our wood floor tones, and is a great, rich neutral color that anyone would enjoy!
Here's my Hubby doin' some painting!!

We just did above the chair rail and the strip inside the tray ceiling.
We left below the chair rail the main paint color, Duron's Bone White (the most lovely creamy color). Had we been staying here, I would have added molding.

Nest, oops, I mean NEXT! We added back in the furniture and accessories we wanted to keep in there.
The main furniture stayed,
but the free rug from my sister and several accessories didn't make the cut!
We opted for no rug because:
it wasn't the best colors,
and
having a rug hiding the beautiful wood floors isn't what you always want when trying to show off those pretty floors to prospective buyers!
If you're re-doing a room, try to "shop" your own house first!!
FREE is always a good thing!
I removed the cluttered antiquey look from the room, and
kept the look fresh and neutral.
Traditional but updated is what I was going for, and
is what buyers in this market look for!
I hung a tray with a black background above the china cabinet.
That tray used to be on my ottoman in the family room!
I also kept everything in the china cabinet creamy white.

A few more accessories were added back in too!
But they were carefully edited and kept simple.


Doesn't this antique oil lamp holder look great with a creamy white candle against the new paint?


I also re-covered my Hubby's great-grandparents dining room chair seats.
Don't they look so creamy-white perfect with this new room?
Wanna know what I used?
Napkins.
Yup, you heard me!
4 for $9.99 at Target
So easy!!

My vintage dresser "buffet" kept it's pretty lamps for some sparkly light,
and also the black urn.
But I kept the "arrangement" simple with some faux ivy in a pot that I already had. Tuck in some moss around the top, and it looks simple and elegant!

The dining table was dressed with a creamy white table runner I got at HomeGoods, and also some pretty but fake hydrangeas and greenery I placed in a real crystal bowl and flanked with crystal candlesticks.
Already had those things, and it gives a traditional look that buyers here look for.
(I usually don't use much in the way of "fakes", but it's balanced out by the other real plants and flowers in the surrounding rooms. So this works!)
I hope that you enjoyed seeing my "new" dining room!!
I also hope it inspires you in that it doesn't take much $$ to get a whole new look! :)
Have a blessed day!!!


Friday, March 20, 2009

I Shoulda Stuck With the Glue Gun...


Wow, what a fast and busy couple of weeks it's been!!
As you may have read, we are moving back "home" to Chicagoland, and our house is now officially (as of today) on the market!
Whoo-hoo!
(Insert nervous feelings and lots of prayers here...)

We have been getting SO many great projects done in preparation for the sale, and doing lots of staging!!!

I'll be sharing them with you over the next week or so, but here's my most recent project and also the worst DIY mistake I've ever made...
let me warn you, it's not for the faint of heart...
and it's ok if you snicker just a little too...
I did...
just a little later after the fact! :)

To make my daughter's shared room seem more spacious from the doorway, I took down the quilt and rack that used to hang on the wall (seen in this post) and replaced it with very inexpensive white letters found at Michael's to spell "DREAM"!

Too easy, and too cute!

I also took fabric that matches the window mistreatments I had made, and made bedskirts!

The plan was to make 2 bedskirts and matching pillow shams.

NOT end up in the emergency room.

Yup, you read that right!!!


Apparently while you're sewing with a very fast sewing machine you should actually be paying attention to what you're doing, and not thinking of the millions of other things left on your getting-the-house-ready-to-sell-to-do-list.

Cause if you don't actually pay attention to what you're doing something very painful and bad can happen...

Did you know that you can actually sew that needle straight through your finger???

And that it will break into like four pieces?

With one piece left in the needle holder in the machine,
and another stuck out the bottom of your finger,
and another piece actually INSIDE your finger??

Yeah...I didn't know that either!
But trust me, after having minor surgery to get that sliver of broken metal out, I won't be making that mistake again!!!
:)

I know that I should "climb back on the horse" soon and finish hemming bedskirt #2,
but for now, I'll be waiting :)! LOL

No use feeling like a complete tool twice in one week!!!

The pillow shams will be waiting for a bit too!

So now, the one on the left is hemmed, and the one on the right isn't.
*sigh*
oh-well
and
la-dee-da!!!

I think I'll be sticking with my hot glue gun for a while :)!

Monday, March 2, 2009

Snow Day Staging


SNOW DAY!!!
I love the feeling of being all snuggly inside when it's yucky outside!

So, I've been puttering around, taking photos of what I've been up to to show y'all!!

And we've been pretty busy lately!
You see, we are going to be putting our house on the market in the next couple of weeks.
Yup, we're moving back "home"!!

And that means getting the house de-cluttered and staged to sell.

I am a FIRM believer in staging a house, it's worked to sell our last 2 places super-quick!
So, I am beginning by de-cluttering and de-personalizing my house.
That includes donating all kinds of things, and taking down family pictures and personal items.
It also includes removing things that are taste-specific.

Next, I'm adding just a few cheery updated things to make the house look it's best.

I'll be updating you and showing you "mini-makeovers" as things go along in the next week or 2, but if you want to know more about staging
check out The Nester and Remodeling Guy's series that started today!
Talk about perfect timing! :)


So, here's a few snapshots of what I've been working on this weekend!:

Adding some gorgeous fake granny-smith apples in an apothecary jar next to my fake lemons in an apothecary jar!

This is in my breakfast nook, and I'm using these cheery spring/summer colors of yellow and green in the whole downstairs for updated color accents!

My downstairs is neutrals paired with wheat to sagey/mossy greens. So adding a punch of bright yellow and green in the entry and kitchen will look so fresh!!


I straightened up my pantry!

I took out the fall/winter arrangement, and am gathering ideas for spring/summer.
Forsythia branches?
Magnolia leaves and white roses?
A gigantic moss sphere?
Just greenery??

I also have to do a dining room table centerpiece.
Hmm....still thinking on this one....

I re-did my bookshelves!
Took off most of the books (it was mostly just filled with books and family pictures),
and have been staging it, and tweaking it. I still may tweak the bottom 2 shelves in the center yet.

Notice the piles on the floor :)!!
Those are getting boxed up!


The old window with family photos that I shared with you in this post came down in the family room, and I replaced it with these Southern Living @ Home wall tiles.

The bronze color goes with my lamps and accents in this room.

Simple!


We worked in the laundry room :)!!
Post coming soon...

And did loads of other organizing and de-cluttering things!


So, there you go!
A peek into my projects!!

Later today, I'll do more to get the house ready to sell....

but for now I'm still wearing this:

the fluffiest, comfiest, warmest robe ever and enjoying my
SNOW DAY!