Showing posts with label decorating. Show all posts

Thursday, August 12, 2010

Dining Room Update


Today I thought I'd share some of the additions we've made to our Dining Room Makeover! I made an "Inspiration Board" of the look we are after, and have been using that as my guide when making decorating decisions. I think it's very Fresh! {Fresh is my favorite descriptive decorating word lately :) !}

Here's our newly painted, yet still blah looking little dining room. It still has it's 1980's chandelier, and a microwave from our kitchen remodel that needs to be replaced with something better (new microwave or new fall clothes -- right now I'm voting for an updated wardrobe! LOL!!):


Before I left for vacation we added these pretty soft white curtain panels from Pottery Barn:


And a mirror that looks very much like this one from PB, but I scored mine at HomeGoods! $19.99 -- can't beat that!! It's hung on the long wall of the room, and REALLY opened things up visually! Can't decide if I'm going to paint it yet or not...


I've also added an orchid, and got some black lanterns (also from HomeGoods) to add in. Next up is finding an old buffet to re-do and getting a new chandelier!


Thursday, May 27, 2010

Easy Organizing & Gift Idea!


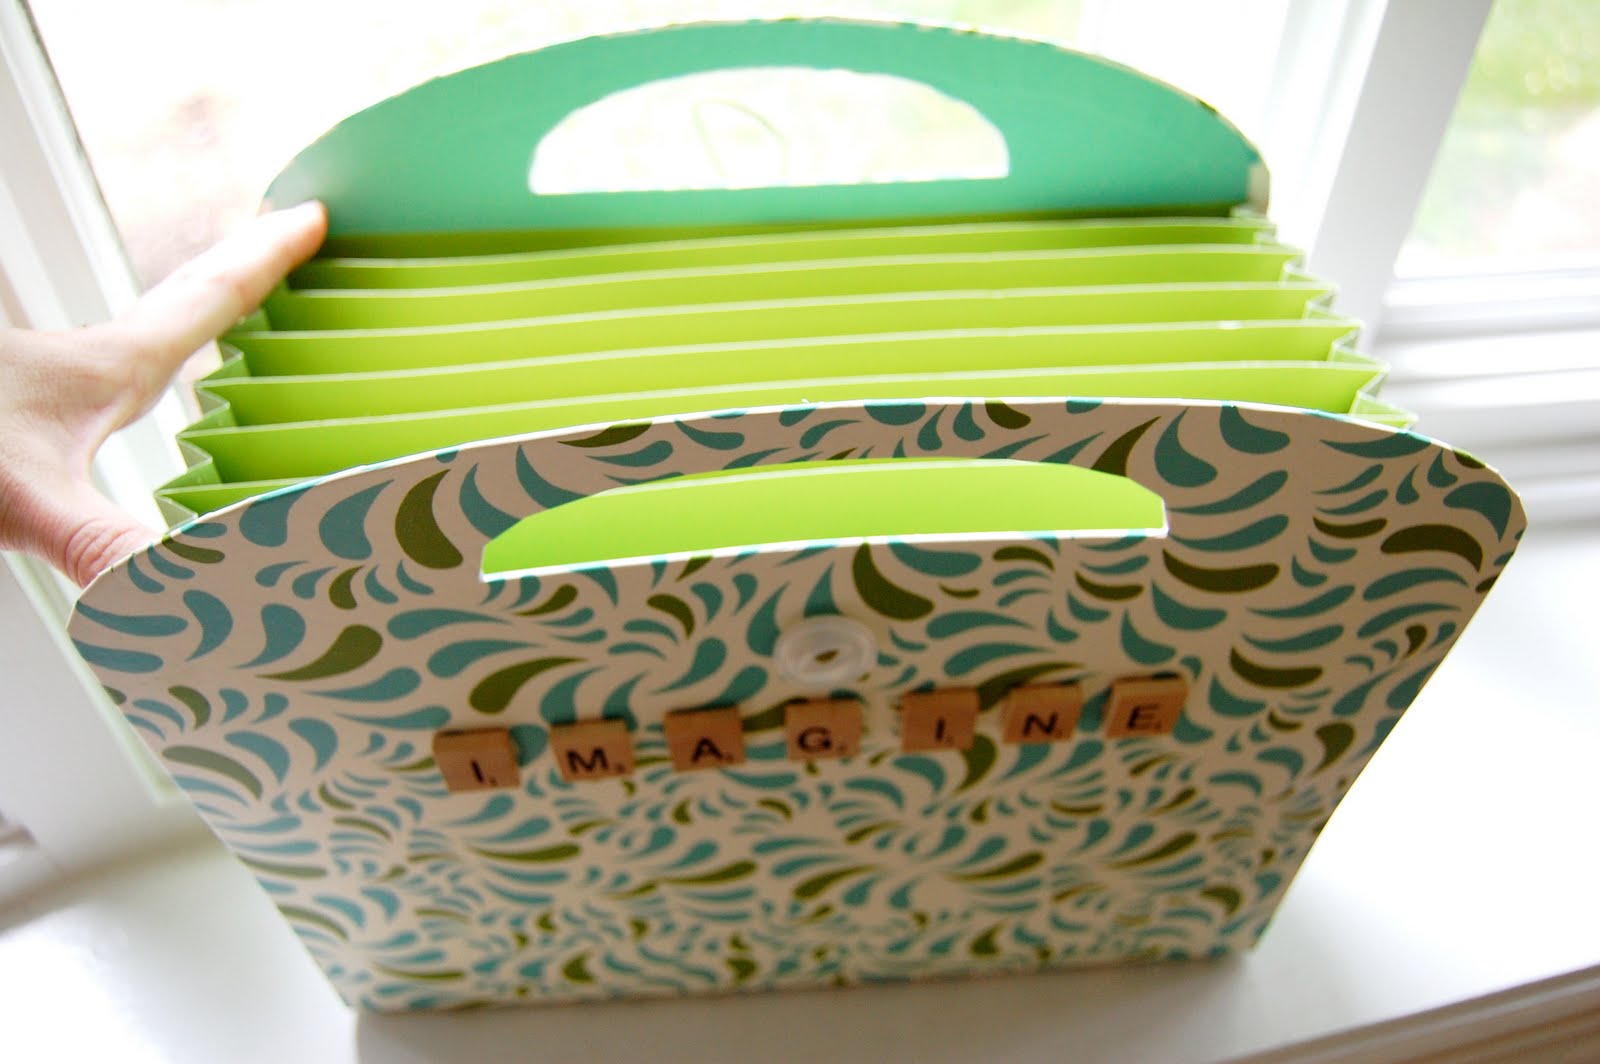
I got this super cute gift from one of my best friends recently, and knew I just had to share it with you!

Do you need a way to organize:

magazine pages you tear out
fabric swatches
room measurements
party ideas
craft patterns
...and more??


Take a look at this!

She took a fun file folder tote and simply added Scrabble letters to the front with some hot glue to spell out "IMAGINE".

Boy, does she know me well! :)

This is perfect for someone (or yourself!) who loves to decorate, plan parties, or get crafty!


What a great way to organize and keep all of those loose tear sheets and samples for a project!

Use Scrabble letters to spell out any number of things:

DECORATE
LET'S PARTY
DREAM
NEST
CREATE
IMAGINE
or
-your blog's name-


Use the file compartments for lots of different ideas (one compartment for each room of your home)

or

for gathering all of your ideas and samples and inspiration for just one project!

Then just change things out when a new project comes a' callin'!!


Isn't this fun?!!

I can't wait to fill mine up with Dream ideas for decorating my home!

Thanks, Friend!!!

{i think this file folder came from target}

*********************************

p.s.: DON'T FORGET...

You only have until Midnight today (Thursday, May 27th)
to enter the book giveaway!


Monday, May 17, 2010

Something Old, Something New...


{my old sunroom}

Something OLD
Something NEW
Something BORROWED
Something....TRUE ?

Well, I changed the old bride's saying up a bit :), but I think this works very well when decorating, too!

Something OLD --

Every space in a home needs a little something "OLD" in it! It adds to the character and history of a room. Whether it's a stack of antique books, or your grandmother's china displayed, or a piece of architectural salvage, this really adds something unique and special to your space!! This gives your home a warmth that can only be created as time goes by!


Something NEW --

A lot of what we own would technically be considered NEW, but how about adding a dash of something more modern to a traditional or more vintage-filled setting? Great lighting is a fun way to add a dash of something new & updated! Add a new pillow or two in a fresh fabric, or how about just updating some of your framed family photos?!!


Something BORROWED --

Ok, I'm using the term BORROWED loosely here! But why not save on your budget and also get something fun & "new to you" by either doing a swap with a friend, picking up an object at a thrift store or flea market or neighborhood yard sale for a song, or even finding some treasure-in-the-rough curbside! You may be surprised!! Just add slipcovers or paint, and you've got a great new look!


Something TRUE --

No matter what the current trends are, stay true to yourself! Have something in each room of your home that really TRUEly reflects who YOU and your FAMILY are! This can be expressed through heirloom pieces, candid photos of the family, a favorite color being used, a fun trend you love, etc.


What did I add to my Sunroom?

Old -- Vintage scale, antique mirror, architectural pieces

New -- Pillows I made, white slipcovers, a sisal rug

Borrowed -- Free couch & chair from my sister when she got new furniture

True -- Garden items, birdhouses, favorite things!

Boy, do I ever miss that sunroom! But I've added my Somethings Old, New, Borrowed & True to each space at my new home!


Look around your home & see if you need to add:
Something Old, Something New,

Something Borrowed & Something True!


Blessings to you today, my friends!!!
:)

Thursday, May 13, 2010

The Queen of Too Many Projects at Once


That's me!

:)

I tend to pick a project to work on (like my kitchen), then just like the dog in the movie "Up", I get distracted by something shiny in another room ("Squirrel!!") and start another project going. Then something in the next space (my dining room) looks like it really needs attention, so I plan that out, and so on & so on.

Till what I'm left with is a lot of half-done projects and not a one of them actually finished!

Not to mention a brain left swirling and feeling frustrated!

I'm very, very, very good at this, by the way!!! LOL!!

So....

here's the plan:

I am going to pick a room and actually finish every little thing in there before going on to another room. And by "finish", I mean I still can tweak things and change stuff around a bit...just all of the major stuff will be done. 'Kay?!

Sound good? Ya with me?

Great. Cause I really am going to need the accountability to make sure this happens ;)!
(And Hubby and my sanity thanks you for it!)

Since I got going so strong in the kitchen, I think I'll keep going in there & finish it up!


{yes, this is the same kitchen! :) "BEFORE" we moved in....

& "DURING"....}


On my list:

Make curtains for the sliding glass door.
Change the light fixture overhead.
Make a "Command Central" area on the side of the fridge.
Add plates by the chalkboard.
Have the trim for the bottom of the cabinets installed.
Add mini white subway tiles on backsplash.
Get new microwave for over stove.


{My very real, wonderful life ... in my very real, definitely used, "DURING" Kitchen.}

************************************

This weekend I'll be working on my list (for the kitchen only!) and hope to try to knock out the whole thing very soon!!


Do you also suffer from Too Many Projects at Once - Itis?


What's your strategy for getting projects done?
I'd love to hear it!!


Thursday, April 29, 2010

Dining Room Decorating Ideas

I really have to say a big, HUGE "Thank You!" to all of you who gave me ideas for what to do with my dining room. I did have some ideas of my own going into this Dining Room Makeover, but as the saying goes, sometimes "two heads are better than one", and I really wanted to hear what you all had to say! It was so much fun to read through your creative suggestions, and imagine all of the possibilities!! So, Thanks! :)


This is an inspiration board I made up to share the "feel" of the new space:


Here's what I'm going for:

The look in my home is what I've termed "Fresh Classic". A more modern, clean, updated look with traditional bones. Add in a little dash of vintage and coastal and garden elements, and you have my style!


I really gravitate toward neutrals with pops of fun & seasonal color.

Wood floors and table will contrast nicely with light creamy colored walls and white slipcovers/clean-lined skirts on the chairs.

Full curtain panels with trim at the inside edges will hang floor to ceiling. Bamboo shades will also be used.

Add in color and texture with a possible sisal rug, artwork of pressed ferns, colorful fabrics & table linens, accessories & flowers.

Find a vintage/antique sideboard & paint (black? a color? who knows??), and hang a large mirror above with artwork and sconces flanking.

A new chandelier (still narrowing down) & lamps will go in the room too.


There you have it!

I can't wait to get started!!!

******************************************

{oh, and if you're wondering what happened with the dropcloth project experiment....let's just say it didn't quite work! bummer. i was hoping to save a lot of money with this one, but hey --

as thomas edison said,

"I am not discouraged, because every wrong attempt discarded is another step forward."

so....guess i'll be trying something different & coming up with a NEW project for that dropcloth!!}


:)
Have a great day!

Tuesday, April 27, 2010

Time For A Dining Room Makeover!

Haaa-loooo! Time to say, "Buh-Bye!" to the 1980's in this Dining Room!!!
First up on the agenda:
Paint
Hubby rolled on some of Mr. S. Williams's "Medici Ivory" for a fresh, creamy look on the walls. I think I really like it! I say think, because the ,um, love-er-ly chandelier in here is casting weird shadows on the walls.
But our goal was to get rid of the cave like feel in here, and make this room feel much bigger than it actually is.
Goal accomplished!

(Oh, and ignore the microwave in the corner...that's until we get our new microwave put in the kitchen soon!)
Next up:
Choosing a new light fixture & window treatments!

Ok, here's the deal....
I would really really really like to know what you would do with this space if it were your room to make over!

Leave me lots of comments with your suggestions!

Get creative!

I'd love to hear your ideas!!!

Friday, April 23, 2010

This Color Is Back in a Fresh, New Way!


Have you spotted it yet? The color that is making it's way back "in"? Some of you are always in love with this color, and some of you have erased it from your homes by now in favor of another. Have you noticed? I'm predicting it's gonna be "back" in a big way soon.

What am I talking about? Why, R E D, of course! Don't believe me? Take a look around!!


The neutral backdrop that we've all created in our homes is perfect for POPS of R E D used as an accent color! Red looks great & classic & fresh with creamy whites, but is also lovely with sand, tobacco, greys, blues, greens..... the list could go on!

And don't expect anyone to go painting red walls anytime again soon (still too reminiscent of the dining rooms of the last decade), but look for it in little touches. Pillows, books, a throw, fruit, flowers, fabrics, art, even a kitchen island! (Have you seen the HGTV Green Home 2010? They used a red countertop on their island....too much for the average homeowner, but there's that RED again!)

Good-bye stuffy, super traditional......HELLO FRESH, FUN, & GORGEOUS!


The red fabric on this white painted bench looks so fresh and cheery against the neutral, sandy painted walls. Paired with another accent of apple green and who wouldn't love this spot in their home?


Love love love love love red paired with gray here! (Can you tell I like this? LOL!!)


Red looks incredible paired with the soft blues and watery greens that we all adore right now, too! That makes it perfect to use as an accent color!

(Is this not the cutest artwork for a kid's room or playroom? How fun!)


Take away the red pillows from this room above and you have a nice room, but add that pop of color and the feel of the room goes from "lovely but ok" to.... "Wow, that's a great space!"


Neutral backgrounds (walls, major furniture pieces) mixed with updated colors as accents gives you an affordable & fun way to change the look of your home. Or even your outdoor spaces!

Again, paired with that blue....love that!


I'm planning to add some red accents in my home for fun!

What do you think of R E D?

How would you use red in your home?

Leave a little comment to say "Hello!" and let us know!

{bottom 2 photos: Pottery Barn, all others in this post: Country Living}

ps--If you have a home-based business, contact me about great, affordable advertising here at The Blessed Nest! theblessednest (at) gmail (dot) com

Tuesday, April 20, 2010

Simple Ways to Beautifully Fake a Roman Shade


I've found that there's more than one way to do a DIY Faux Roman Shade!

When a project needs to get done, I'm all about a great look for little work. You may call it lazy, but I call it working smart! I knew that I wanted a Roman Shade for over my kitchen sink, but according to Moi it had to be:

1) A Fake -- I don't need it for privacy, just for "pretty's sake", so there was no need for it to really work.
2) Simple to Make -- so many directions out there are crazy long with so many steps...ugh!
3) Looking Great When It Was Done -- 'nuff said!!!

I think I was able to accomplish my goals for my kitchen shade:

{please excuse the photos they were taken at night!}

Yay! I finally got my Fake Roman Shade done today!!

We're really happy with how it turned out!

Here's how I did it:


First measure your window & add a couple of extra inches to the width & several to the height. Since this is a stationary/fake roman shade (it will NOT be moving up & down) you can pretty much guesstimate this part. Easy, right?! :) Do the same for your liner if you want one.

Next, hem the sides (sew it, or with iron on hemming tape) so that they are even with the sides of your window. My shade is an exterior mount, so I went with the outside of the moulding (though if there were space, I'd go a couple inches beyond the moulding). If you have an interior mounted shade, then hem the sides of your shade to the interior of the moulding.

Fold up the bottom hem next, and do a nice 4 inch or so hem. Again, just eyeball what looks good to you.

No need to hem the top since it will just be hidden anyway!
Staple gun the top of the shade to a board (size depends on on whether it's interior or exterior hung -- I used a 1x3).


Here's where you can do several things:

(it's really up to you!)

* Fold it up & hand stitch at several points. Done.
* Add (hand stitch) little rings, (or fabric glue ribbon loop "rings") then take ribbon & thread through the rings, and staple it to the board at the desired height. Done. (I did this & it was easy to take out the staples if I wanted to adjust it more. I did 4 rings up & 4 rows across.)
* Fold it, and use a big ol' safety pin to pin it together (I've done that it the past). Easiest of all!
* Roll it up and tie with ribbon or coordinating fabric ties. (Technically a roman shade? Hmm...oh well, it's still super easy!)


Add L-brackets to your board, & hang, or just screw the board in the top of your window moulding.

Adjust the fabric & You're Done!!!


Big thanks to Hubby for hanging it for me!
:)


Making your own Faux Roman Shade really can be easy-peasy!

Give it a try :)!!!


The simplest way to do a Faux Roman Shade?
Check out how I did it in my little girls' room here.

I really hope that this will inspire you that you CAN make a pretty roman shade & it can be EASY too!

I'm linking up with DIY Day at A Soft Place to Land.
and

{more kitchen makeover pics coming up next!}

Have a blessed day!
:)

ps.-- If you're a small business owner or a momtrepreneur, I currently have openings in my advertising section here at The Blessed Nest! Contact me for more info! :)

Sunday, April 4, 2010

Mini Makeover on My Upstairs Landing


Many moons ago I showed you my "Before" pic for my upstairs landing by our bedrooms:


Everyone had some amazing ideas for what I could do there! I loved reading all of the ideas, and eventually combined some of them with my own ideas and.....voila!


Here is my Mini Makeover "After", or should I say "During":


I added some family heirloom pieces from our grandparents to the glass front antique cabinet.

On top are some family photos, a battery operated candle on a cream pedestal (doubles as a nightlight), and a vintage silverplate pitcher that's all tarnished for some interest with some real-looking but fake seasonal branches.

I've been changing out the branches with each season, and love how they come up and "tie together" the cabinet with the champagney-silver colored framed mirror above!


On the staircase wall I hung some framed black & white photos of the girls. I loooove these photos! They make Hubby & I smile each time we pass by!! I may eventually add more photos and objects to this staircase wall for a collage/gallery effect.


I still want to paint up here and also update the lighting. I may be adding some more to the walls too, but I still have to think about what would look best. My house is very open and not very large, so I like to keep a fresh, clean look without much clutter. Hmmm....

I'll definitely keep you posted on the updates!

Hope you liked the "Mini Makeover" on our landing!!! :)


Friday, April 2, 2010

Guest Room Before & After -- Or: The Amazing Power of Paint!

With my kids on Spring Break this week, and all of the little (and BIG!) projects I'm working on right now, I had completely forgotten that I never showed y'all our

Guest Room Makeover!

Get ready for a Before & After
where the only $ that was spent in the room was for PAINT!
We used what we had to decorate & furnish the room.


BEFORE:


Sky blue with sponge-painted clouds above the chair rail,
and grass green below.

Yikes.


AFTER:


We primed & then painted a soft buttery creamy color (SW Decor White). What a huge difference the new paint made!

It went from a themed kids' room, to a lovely & soothing retreat for our guests!


The bedding is a cream colored matelesse with matching euro shams (from Linens-N-Things, which is now gone), two PB pillows, and the black pillow with the floral design was from Target a few years ago.

The curtains hung in our old dining room in NC. And the antique botanical prints were found on a trip to Door County, WI years ago, then framed in inexpensive frames from Michael's.

The lamp is a fun one :) from Homegoods, and the wicker chair was my mom's when she was in her early 20's.


I still have plans to make an upholstered headboard and also get a new dresser (this one is an old hand-me-down) and a mirror to hang above it.

We're going to paint the doors to match the trim, too. I'm sure the previous owners loved the doors this way, but to me they just stick out visually too much. Would you paint them?

I also would like to add maybe some plates or something pretty to the wall around the dresser, but in time....


I love how simple yet fresh & pretty this room is!

Since it is our guest room, I like to put a couple of pictures of those who use it most in here, which is our families.


Black is the bold accent we're using in this space.
It's picked up in picture frames, a pillow, candlesticks, and a lamp shade, as well as the curtain rod.


I love how the modern floral look on the throw pillow really plays off of the antique botanical prints hanging above the bed!


I am always amazed how just a little paint can completely transform a space! Now I really want to get moving painting the dining room & living room!!

Don't be afraid to just pick a color and get your project "rolling" (haha!)! Move a few things you already have around, and you'll end up with an entirely new look for very little money! Give it a try!

I'm linking to The Shabby Nest's Frugal Friday Linky Party!

{Oh, and since so many of you had written to tell me that you wanted to do the Linky party again, be sure to come on back tomorrow to link up for the
Green Thumb Gardening Day linky party!
See ya then! :) }