Showing posts with label projects. Show all posts

Thursday, May 27, 2010

Easy Organizing & Gift Idea!


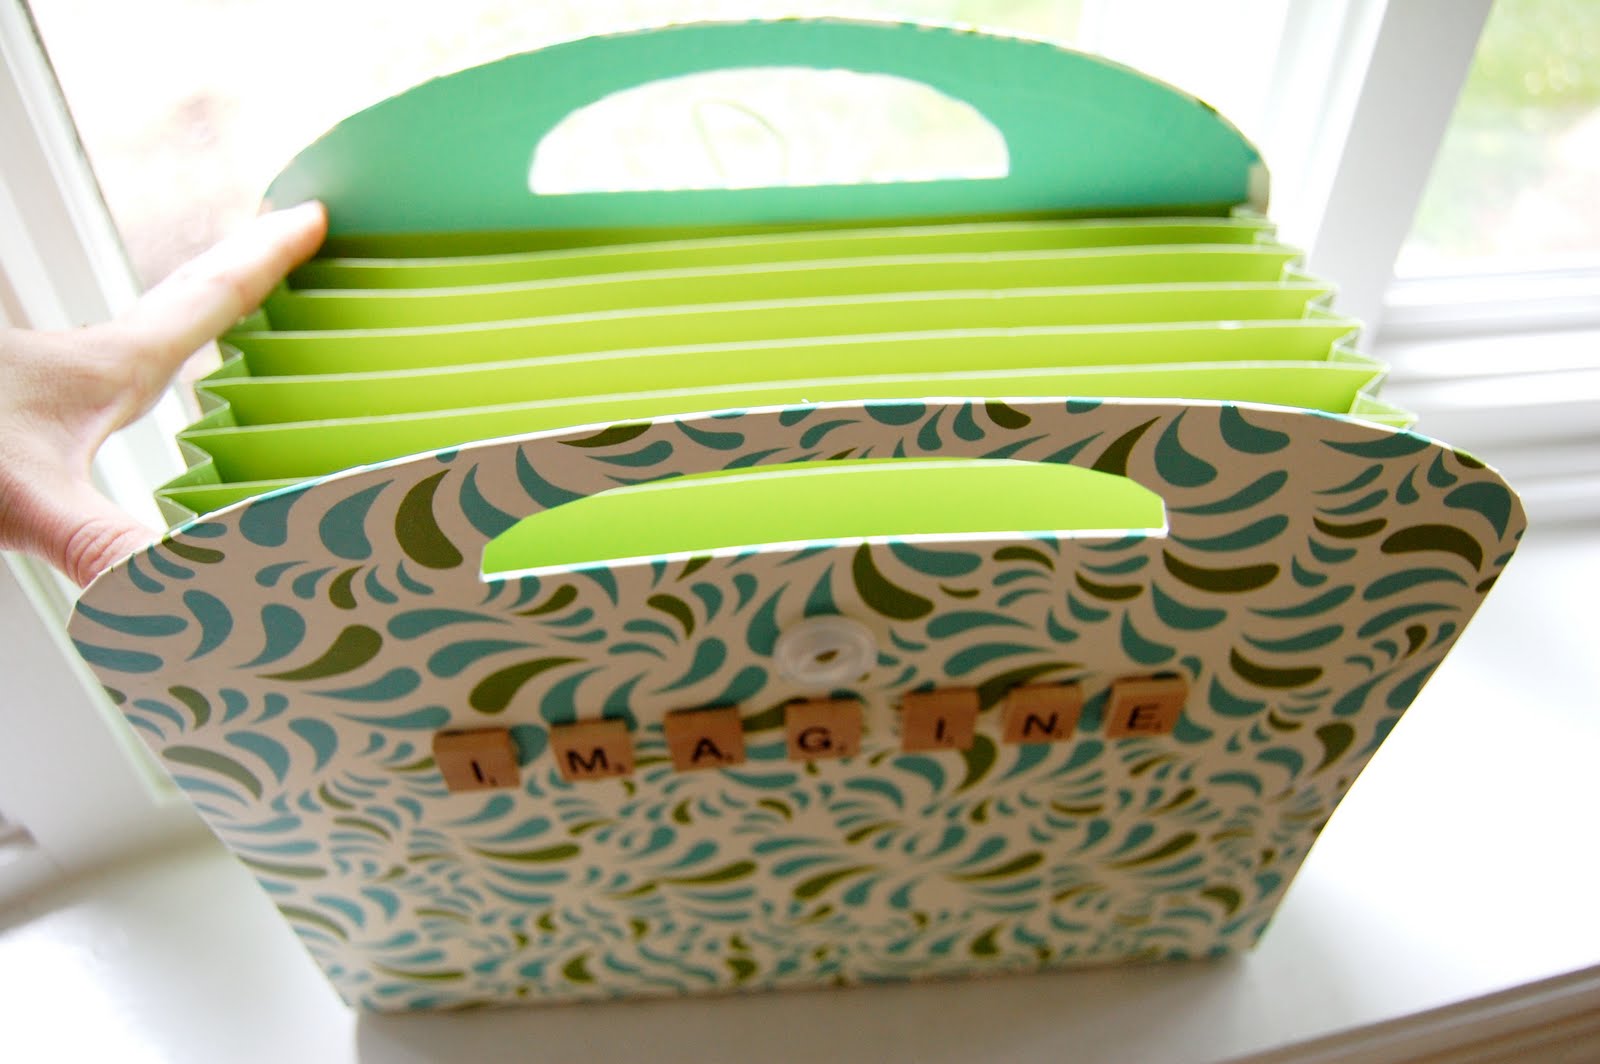
I got this super cute gift from one of my best friends recently, and knew I just had to share it with you!

Do you need a way to organize:

magazine pages you tear out
fabric swatches
room measurements
party ideas
craft patterns
...and more??


Take a look at this!

She took a fun file folder tote and simply added Scrabble letters to the front with some hot glue to spell out "IMAGINE".

Boy, does she know me well! :)

This is perfect for someone (or yourself!) who loves to decorate, plan parties, or get crafty!


What a great way to organize and keep all of those loose tear sheets and samples for a project!

Use Scrabble letters to spell out any number of things:

DECORATE
LET'S PARTY
DREAM
NEST
CREATE
IMAGINE
or
-your blog's name-


Use the file compartments for lots of different ideas (one compartment for each room of your home)

or

for gathering all of your ideas and samples and inspiration for just one project!

Then just change things out when a new project comes a' callin'!!


Isn't this fun?!!

I can't wait to fill mine up with Dream ideas for decorating my home!

Thanks, Friend!!!

{i think this file folder came from target}

*********************************

p.s.: DON'T FORGET...

You only have until Midnight today (Thursday, May 27th)
to enter the book giveaway!


Tuesday, April 20, 2010

Simple Ways to Beautifully Fake a Roman Shade


I've found that there's more than one way to do a DIY Faux Roman Shade!

When a project needs to get done, I'm all about a great look for little work. You may call it lazy, but I call it working smart! I knew that I wanted a Roman Shade for over my kitchen sink, but according to Moi it had to be:

1) A Fake -- I don't need it for privacy, just for "pretty's sake", so there was no need for it to really work.
2) Simple to Make -- so many directions out there are crazy long with so many steps...ugh!
3) Looking Great When It Was Done -- 'nuff said!!!

I think I was able to accomplish my goals for my kitchen shade:

{please excuse the photos they were taken at night!}

Yay! I finally got my Fake Roman Shade done today!!

We're really happy with how it turned out!

Here's how I did it:


First measure your window & add a couple of extra inches to the width & several to the height. Since this is a stationary/fake roman shade (it will NOT be moving up & down) you can pretty much guesstimate this part. Easy, right?! :) Do the same for your liner if you want one.

Next, hem the sides (sew it, or with iron on hemming tape) so that they are even with the sides of your window. My shade is an exterior mount, so I went with the outside of the moulding (though if there were space, I'd go a couple inches beyond the moulding). If you have an interior mounted shade, then hem the sides of your shade to the interior of the moulding.

Fold up the bottom hem next, and do a nice 4 inch or so hem. Again, just eyeball what looks good to you.

No need to hem the top since it will just be hidden anyway!
Staple gun the top of the shade to a board (size depends on on whether it's interior or exterior hung -- I used a 1x3).


Here's where you can do several things:

(it's really up to you!)

* Fold it up & hand stitch at several points. Done.
* Add (hand stitch) little rings, (or fabric glue ribbon loop "rings") then take ribbon & thread through the rings, and staple it to the board at the desired height. Done. (I did this & it was easy to take out the staples if I wanted to adjust it more. I did 4 rings up & 4 rows across.)
* Fold it, and use a big ol' safety pin to pin it together (I've done that it the past). Easiest of all!
* Roll it up and tie with ribbon or coordinating fabric ties. (Technically a roman shade? Hmm...oh well, it's still super easy!)


Add L-brackets to your board, & hang, or just screw the board in the top of your window moulding.

Adjust the fabric & You're Done!!!


Big thanks to Hubby for hanging it for me!
:)


Making your own Faux Roman Shade really can be easy-peasy!

Give it a try :)!!!


The simplest way to do a Faux Roman Shade?
Check out how I did it in my little girls' room here.

I really hope that this will inspire you that you CAN make a pretty roman shade & it can be EASY too!

I'm linking up with DIY Day at A Soft Place to Land.
and

{more kitchen makeover pics coming up next!}

Have a blessed day!
:)

ps.-- If you're a small business owner or a momtrepreneur, I currently have openings in my advertising section here at The Blessed Nest! Contact me for more info! :)

Wednesday, April 14, 2010

Fun Fabric Pennant Banner


Ok, I seriously had fun making my very first fabric pennant banner!

My daughter's teacher is having a surprise baby shower today at school and since I'm a room parent I am in charge of decorations. Perfect time to have fun and make a banner!


Baby Boy's nursery is decorated in shades of chocolates & browns & greens & blues. I chose to do an extra-long pennant banner filled with all kinds of different, fun fabrics!


Wouldn't this be fun hanging in a nursery or a playroom?


Or used for birthday parties and celebrations as baby grows up?


I love the modern, fresh fabrics so much! I actually think that this banner could be for boys or girls. That's why I'm making another like it for my girlie-girls!!


I've really missed being "crafty" & think this was the jumpstart I needed to get back to having fun and crafting new projects!!!


I really can't wait to make more of these!


I'm linking up with Kimba's DIY Day...

DIY Day @ ASPTL

and also Just A Girl's Show and Share Day

Let me also give a big ol' warm "Welcome, Friends!" to all of the new Followers here at The Blessed Nest! You're so sweet!! I'm so glad to have you here, Welcome!!!

This post brought to you by my sponsor: Red Letter Words! Her artwork is so inspiring...check it out!


Sunday, January 10, 2010

Chalkboard Plate Project

{above, The Blessed Nest}

I just had to show you all this *too cute* project that a reader sent me!

Ms. Carli of Fearfully and Wonderfully Made
saw an old post of mine that showed this platter (above) that I had the artist Jan Dutcher paint for me.

I first saw Jan's work in a magazine article and fell in love with the style of her work. Then I saw her work again, featured in a shop that was showcased in a different magazine. When I called the shop to ask about purchasing the platter I had fallen in love with, the piece had already been sold, :( but I convinced them to ask the artist to paint another "Family" art platter for me! :) The words perfectly describe our family! This is a piece that we display and love!!


So imagine my delight to see how Carli has made this plate her own by coming up with this cute project!


{this pic: Fearfully and Wonderfully Made}

Carli took an old round platter/plate that she already had and transformed it with a favorite product here in bloggyland : Chalkboard Paint!

Then she added wording that describes HER family values perfectly!

I love this project SO much!!
Thanks for sharing with us, Carli!

Be sure to check out Fearfully and Wonderfully Made....she's got some fun projects and a great eye for trash to treasure transformations!


Let me know if a project or post here at The Blessed Nest has inspired you! I'd love to post a picture about it :)!

Thursday, December 3, 2009

Easy-Peasy, Just-Looks-Like-A-Million-Bucks, Use-What-You-Have Garland!

This Christmas season I decided to decorate using things I already had.
Which, since we're living in a new house now, meant that I had to get creative and use old things in new ways!

That's just what I did when I made this garland below:

{wanna know how I did it & how you can make one too? keep reading!}

Looks all "fancy" now, doesn't it? I honestly can't believe how simple this was to do! It only took about 15 minutes to make! I knew I had to share this with you!!!

Well, this garland used to be a plain ol' thing that draped along our staircase banister.
Cute, but a bit "blah".

Since I now live in a split-level house, the stair banisters aren't nearly as long and wouldn't work well for garland. So I looked for a new spot for it, and....
....up on top of the bookshelves it went!
So....

Step 1: Find a great place for your garland!


Step 2: Next, gather up some things you already own:

ribbon
ornaments
pinecones
lights (if your garland isn't pre-lit)
something to attach the ornaments to the garland
(like floral wire, or green pipe cleaners, or if you're lazy like me: long wire ornament hooks)
something to fill it out a bit (feathers, branches, more fake greenery, decorative sprays...)

Now you're ready to get started "fluffing" your garland!


Step 3: If your garland is not pre-lit, go ahead and add lights to it now.....
....it's OK, we'll wait for you....
:)

Ready?

Time to make our super easy bow!
This is easiest if you have a long length of ribbon.

Starting near the middle of the ribbon start to loop it around several times.
Kind of like when you wind up a garden hose, or if you were a cowboy gathering up your rope!
LOL!!!
Do it several times until you'll have 3 "loops" for each side of your finished bow.
You should have 2 "tails", one on each side of your bow.
Try to work your "loop" so that the "tails" are similar length.
But don't stress too much about it, it's gonna get tucked around anyway!

Next, take a short piece of the same ribbon and wrap it around the center of your "loops", tying in a little knot in the back side of the "loops". This will make your bow look like it is tied.
Be sure to leave the ends of this knot a little long, don't clip them!

Go ahead and fluff out your bow!


Step 4: Attach the bow to the garland.

Take the ends of your bows' knot and use them to attach the bow to your garland. Just knot it around the garland, then fluff the greenery around your knot a bit. No one will see!

Next, gently wind the ribbon "tails" about the greenery, play with it till it looks good to your eye. I added little fake ribbon loops by just making one little loop and using scotch tape to secure it. That's what I had on hand! A little florist's wire or even a garbage bag tie would work too!

Step 5: Attach ornaments to the garland.

Gather some small leftover ball ornaments together into groups of 3.
Using your floral wire or a green pipe cleaner, string a group of ornaments on, then twist the wire together by the ornaments to secure them on.
Add the ornaments to the garland by twisting the wire securely around several branches of greenery.

I added ornament groupings by my bow, near my "loops" of ribbon, and toward the end of my garland.


Step 5: Add in the pretty fillers!

I used pheasant feathers and pinecones to "fill in" my garland in a few spots and make it extra fluffy-full and pretty!

Use what you like. Maybe something that coordinates with your tree!
Feel free to adjust things around until you're satisfied with the look of your garland!

That's it!

Plug in the lights and enjoy it!


Now you know how to get an expensive, designer-store looking garland on a Use-What-You-Have budget!

How are you using what you have this year?

Tuesday, July 7, 2009

A Great Day!

(pic from Leigh's Life)

Remember my Fun Chalkboard Paint Project??

I was thrilled to have Leigh Ann from Leigh's Life send me a link to her blog where she showed her version (see picture above) of not only this Chalkboard Paint Project but 2 others!!!
Leigh Ann had a beautiful spread set out for members of her church on Sunday morning, and can I just say that it is TOO CUTE!! This would work great for a backyard BBQ or neighborhood potluck as well!

Thanks for sharing with us, Leigh Ann!

If anyone else has tried this project, or any of my projects, I'd love to see a picture & would be happy to feature it on my blog! :)


Also, a big Thank You to Naturally Jules for this "One Lovely Blog Award"!!!
How sweet, I really appreciate it! :)
I need to list 6 Things That Make Me Happy Today:
(in no particular order!)
:-)
  1. The homemade sausage, egg & cheese biscuit that Hubby made me for breakfast!
  2. The beautiful, sunny, blue-sky day outside!
  3. An amazing Hubby who I love more & more with each passing day, & 2 wonderful children who brighten my day with their hugs and "baby-kisses"!!
  4. That everything seems to be moving in the right direction for our house closings.
  5. That I am around 75% finished packing! Whoo-hooooo!!!
  6. Dear, dear friends......like you! :)
Have a Wonderfully Blessed Day!

Thursday, June 4, 2009

Beachy Bottles -- You Can Fake It Too!

Since I know everyone in blogland LOVES a good "fake-it-on-the-cheap" project,
y'all are just going to go gaga over this one!

Summertime Faux-Soldered Beachy Bottles


I'm sure somewhere you've seen a version of these pretty shells soldered on a vintage bottle.
The pic below is from Wisteria, and a set of 3 bottles (you don't know what bottle or shell you're gonna get) costs a whopping $149.00.

Love the look, don't love the price.
Can you relate?

{above picture: wisteria.com}


So, I decided to try out a version of this for myself using what I had on hand!

Here's my version below:


If you're like me (or most of us!) & can't solder, but can wield a hot glue gun.... then this easy project is for you! :)

Here's what you'll need:

Vintage Bottles of Any Kind
Collected Shells & Starfish
Jute Twine
Hot Glue Gun


Easy-Peasy Lemon-Squeezey Instructions:
Hot glue shell to top of (or just inside lip of) your bottle.
Don't worry about it being perfect, the hot glue is just gonna get covered up soon anyway!

Cut a length of your jute twine and wrap it around the lip of the bottle, hot gluing as you go.
Keep wrapping & gluing up toward the base of the shell. Glue and wrap till you meet the base of the shell, trying to cover any left over gaps on the top of the bottle, and then finish twine off in the back side.

Add a few tiny shells for fun if desired.
Enjoy!


I personally think that the jute adds a fun coastal feel to this project!
Perfect for Summertime or Anytime!!


Display your pretty Beachy Bottles anywhere....on a shelf, grouped as a centerpiece, or next to the tub! You can't go wrong :)!!


The beauty of hot glue is that it can easily peel off the bottle and shell for when you want to do a different project!


I hope that you like this fun & easy project!
Let me know if you try it, I'd love to see pictures!! :)

Have a Blessed Day!